“Oh no! I could have won if my PC hadn’t lagged.” As a gamer, have you ever said anything similar? Your answer is most likely yes.
FPS drops and lag issues are unarguably the most frustrating gaming experiences, especially when playing frantic PC shooters like VALORANT. These issues can significantly degrade your performance and ultimately result in defeat. Certainly, you can fix these issues by adjusting the graphics settings.
This guide will catch you up with all the settings and alterations you need to make to enhance your VALORANT graphics. As shown in the table of contents below, this article is divided into sections to ensure you get pointed in the right direction for tweaking graphics options as per your needs.
If you are on a mission to make your VALORANT settings ideal, you should also check out our dedicated articles for the following:
Why do you need to optimize VALORANT graphics?
Before moving on to the best graphics settings in VALORANT, if you’re unsure whether to change those settings or leave them the same, here are some reasons why you should alter those settings.
- Improve game performance: Optimizing graphics settings can help improve the frame rate of VALORANT, making it run more smoothly. This can be especially significant if you have an older or less powerful computer, as it can help reduce lag and stuttering.
- Better visuals: Some graphics settings, such as the resolution and anti-aliasing, can significantly affect the visual quality of VALORANT. By optimizing these settings, you can make your game look better and more immersive.
- Compatibility: You may be unable to play Riot’s FPS smoothly even if the minimum system requirements for running the game are met. Having optimized settings can assist you in resolving such issues.
Overall, optimizing your graphics settings can help improve VALORANT’s performance, visual quality, and enjoyment.
Best VALORANT graphics settings for high-end PCs (with graphics card)
High-end PCs have powerful processors, enough memory, and other configurations that allow VALORANT to run smoothly. Players with high-end PCs can even play the first-person shooter without a dedicated GPU; however, if they have dedicated GPUs installed on their system, such as NVIDIA or AMD’s GPUs, nothing more is required for excellent performance.
Having said that, many players, without considering their needs, set all graphics options to their highest setting. This eventually prevents their systems from operating at their peak efficiency.
Although your PC can easily handle the game’s load, it is always recommended to play with minimal settings and avoid turning on unnecessary options that consume computer resources. This ultimately boosts frame rates (FPS) and decreases latency.
Let’s optimize VALORANT graphics settings both in-game and via the GPU’s control panel.
Best VALORANT Video settings (in-game)
To optimize graphics in-game, you need to go to the Video section of the settings. The VALORANT video setting is composed of three sections: general, graphics quality, and stats. Let’s go through each in detail.
Note: These VALORANT Video settings can also be applied by those who have higher-spec configurations but don’t use external GPU (graphics card).
General graphics settings
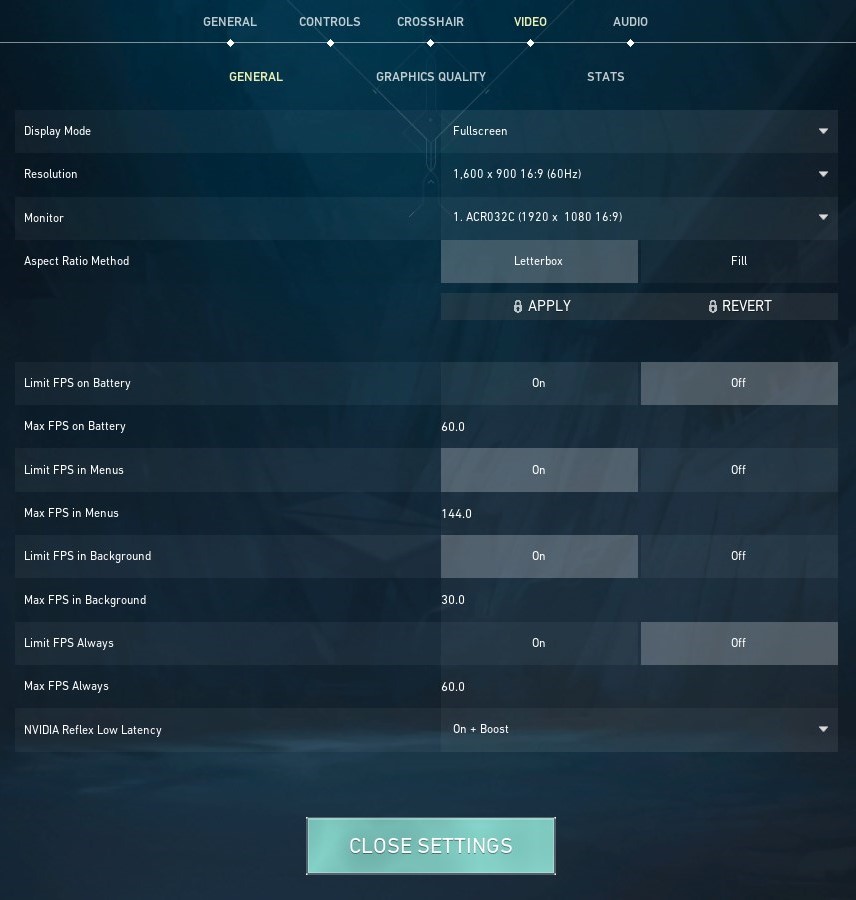
- Display mode – Fullscreen: Playing at this setting will help you get larger view of the display and also the client to perform its best in all its features. Nevertheless, you can go with Windowed display mode if you have to do multitasking like the tasks of content creators.
- Resolution – Native: Keep in-game resolution to your native monitor resolution. For an instance, if your monitor’s resolution is set on 1980 x 1080 then keep in-game the same. Here’s how you can check your monitor resolution.
- Monitor – [choose your monitor]: You don’t need to focus on this option until you have multiple monitors.
- Aspect ratio method – Letterbox: Letterbox is a fine aspect ratio for VALORANT.
- Limit FPS on Battery – Off: If you are a PC (desktop) player, you don’t need to think about this particular option, simply turn it off. However, if you are a laptop player, you may turn it on to save battery charge. That said, you will have to compromise with the FPS upon activating it.
- Limit FPS in Menu – On: Turning it on doesn’t hamper your gameplay as the FPS gets limited when you minimize the VALORANT Window. Turn it on if you frequently switch Windows when playing. It can be advantageous for streamers, content creators, and analysts.
- Limit FPS in Background – On: By turning it on, you can limit FPS in the background, that is when you don’t control your gameplay and have opened a different in-game screen, like the settings panel.
- NVIDIA Reflex Low Latency – On + Boost: This setting can significantly reduce the latency and provide you with smooth gaming experience. It is only available for NVIDIA GPU users.
SecretLab’s Gaming Chairs VALORANTs Love


Graphics quality settings
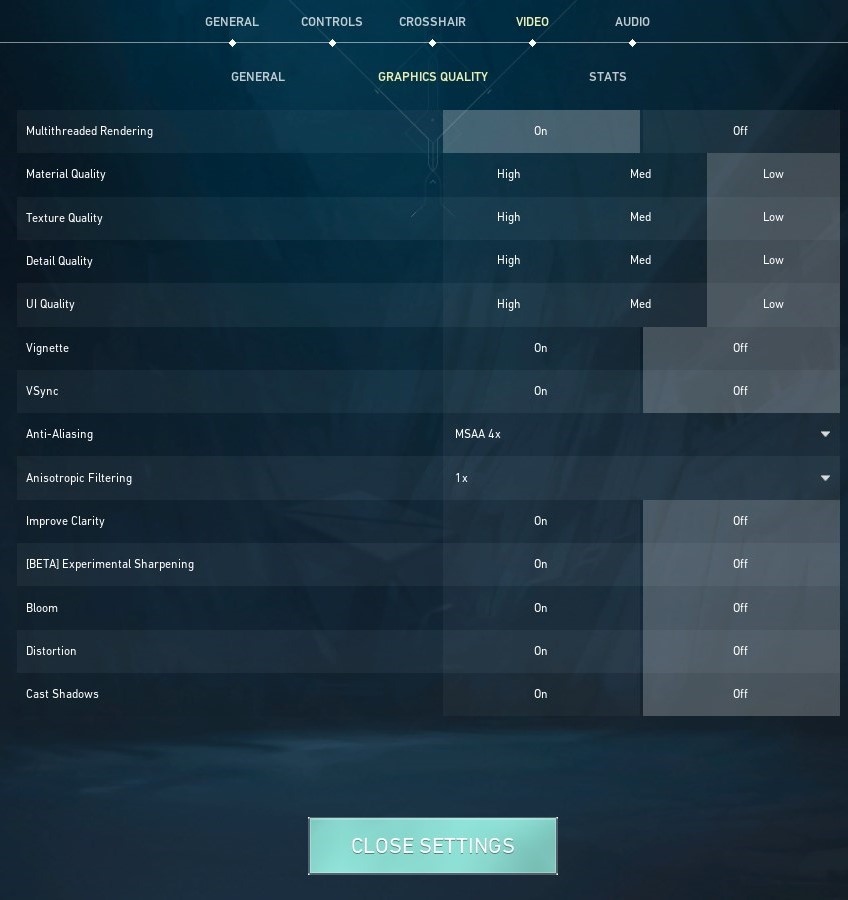
- Multithreaded Rendering – On: This video setting enhances your CPU’s performance and the graphics quality.
- Material Quality – Off*
- Texture Quality – Off*
- Detail Quality – Off*
- UI Quality – Off*
- Vignette – Off: It’s just a visual effect. Best to turn it off.
- VSync – Off: VSync (vertical sync) synchronizes game’s frame rate with that of the monitor’s. It is recommended to leave it Off, particularly in VALORANT.
- Anti-aliasing – MSAA 4x: If you want better image quality and visuals, keep anti-aliasing at MSAA 4x or MSAA 2x; however, if your PC is not that powerful, you might notice slight FPS drops.
- Anisotropic filtering – 4x or below: Anisotropic filtering makes distant objects look sharper. However, scaling this setting may lead to an increased GPU load and eventually consequent in decrease in the frame rates. Hence, keep it lower or simply try and test the options and then decide which one suits you and your PC. It is recommended to set it 4x or below.
- Improve Quality – Off: If visuals are your preferences then turn it on, while if best gameplay performance is what you want, turn it off.
- Experimental Sharpening – Off: When VALORANT experimental sharpening is turned on, your game will look sharper and you can get rid of blurry visuals. However, it is best to leave it turned off because it may reduce FPS and increase latency due to increased use of GPU resources.
- Bloom – Off: It is another visual effect that can be turned off without thinking much.
- Distortion – Off: Just a visual effect and it is also recommended to turn off.
- Cast Shadows – Off: Hiding shadows will prevent your GPU from extra rendering and eventually boost the FPS.
*Note: Even the “low” quality setting produces adequate graphics. Notably, having a low-quality setting will help you get better FPS.
Stats settings
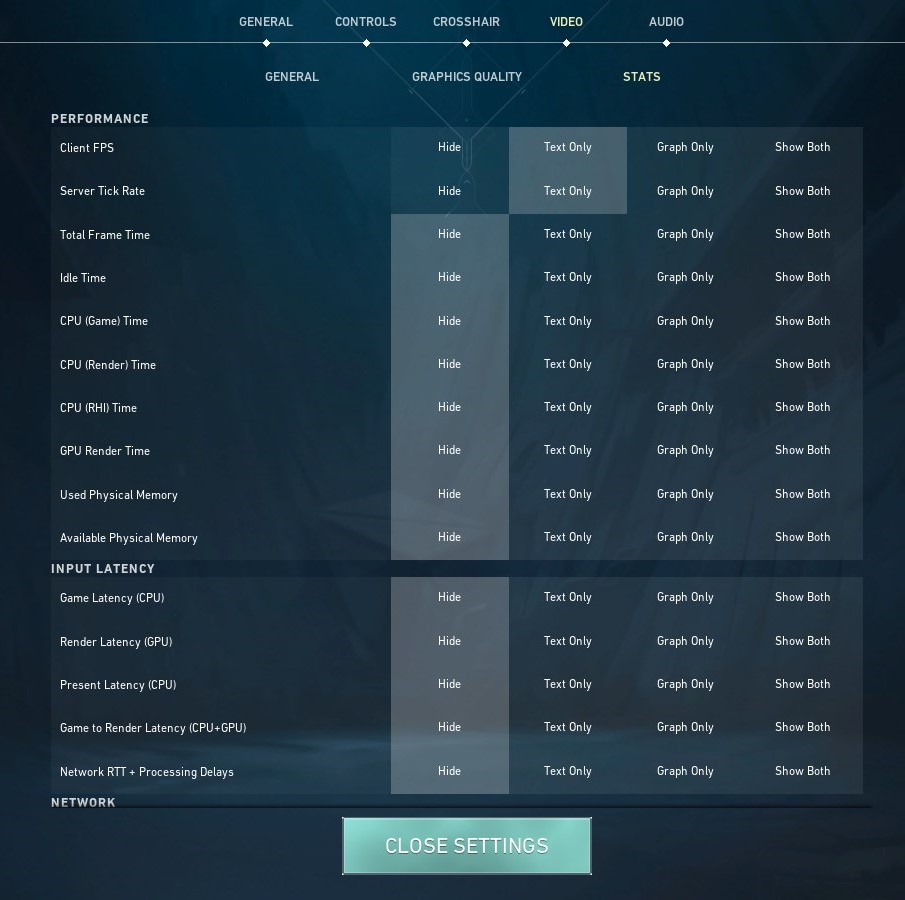
The stats section allows you to display or hide several stats while playing, like Client FPS, Server Tick Rate, etc.
You usually don’t need to alter these settings. However, if you are analyzing the game and the benchmarks, you can check this section comprehensively. For casual gamers, the Client FPS setting can be useful. They can set it to “Text Only” to see their current FPS, which will be displayed on the top-left corner of the game screen while playing.
Best NVIDIA settings for VALORANT
NVIDIA provides gamers with a bunch of advanced graphics options. Therefore, after optimizing the in-game video settings, you should also take a look at the NVIDIA control panel settings for VALORANT if you have the manufacturer’s GPU on your system.
To proceed, you need to first ensure you have the latest driver installed on your system. To do that, open NVIDIA’s GeForce Experience application and check if there is an updated version of the graphics driver available. Or, you can also visit NVIDIA’s official website to look for updated drivers.
After having the latest driver installed, open the NVIDIA control panel by searching for it in the Windows search bar or right-clicking on the desktop and selecting it from the menu that appears. Subsequently, head to the “Manage 3D Settings” option and then click “Program Settings” to add “VALORANT” to the list. Now, you can proceed with optimizing NVIDIA settings exclusively for your favorite first-person shooter.
Note: The NVIDIA cPanel also includes some settings that we have already optimized in-game, as described in the earlier sections. So, let’s look at only the major additional options. You should keep in mind that your in-game settings may be overridden if you alter the same settings via the NVIDIA cPanel. So, make sure you set those options to the same values as in-game to avoid conflicts.
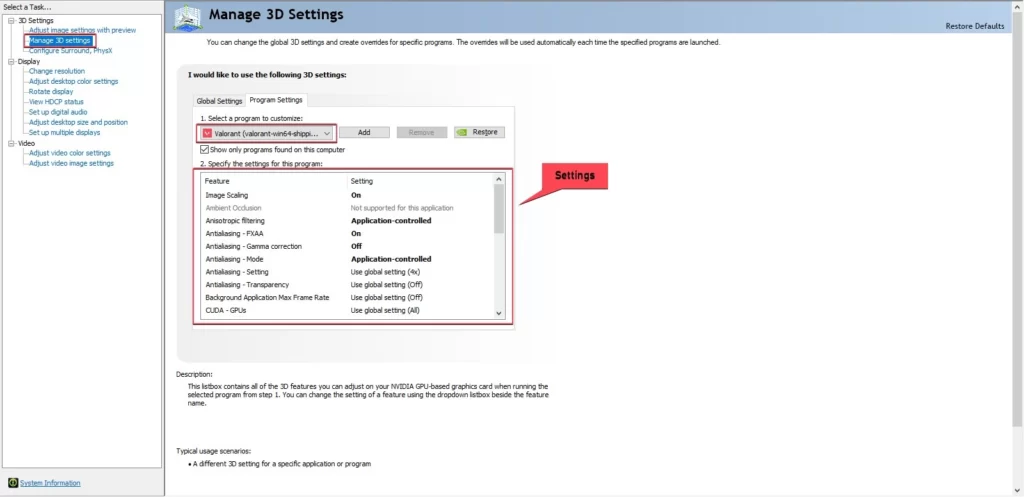
- Image scaling – On: It will enhance GPU performance and sharpen the visual quality across the VALORANT Client.
- Anisotropic filtering – Application-controlled
- Antialiasing FXAA – On
- Antialiasing Gamma Correction – Off
- Antialiasing mode – Application-controlled
- Antialiasing setting – 4x
- Antialiasing transparency – Off
- Background application max frame rate – Off
- CUDA GPUs – Off
- Low Latency mode – Ultra: You must not forget to set it to ultra to highly reduce the latency and get a lag-free experience as a result.
- Max frame rate – Off: This setting is used to limit the FPS and ultimately conserve power. Best to keep it Off if you don’t want to compromise with the frame rate.
- Multi-frame sampled AA (MFAA) – Off
- OpenGL GDI compatibility – Auto
- OpenGL rendering GPU – [keep your GPU model selected]
- Power management mode – Prefer maximum performance: This setting enables the power management mode by prioritizing maximum performance.
- Texture filtering (Anisotropic optimization) – On
- Texture filtering (Negative LOD Bias) – Allow
- Texture filtering (Quality) – High performance: This setting provides the texture quality required for high performance.
- Texture filtering (Trilinear optimization) – On
- Threaded optimization – Auto
- Triple buffering – Off
- Vertical sync – Off
- Virtual reality pre-rendered frames – 1
- Vulkan/OpenGL present method – Auto
The term “application-controlled” means that the specific setting will be applied exactly as it is set in-game.
In the above list of settings, only the important ones are explained. You can set the rest as shown without much concern for them. Notably, these settings should be adjusted by considering the in-game settings we discussed earlier.
Best AMD Radeon settings for VALORANT
If you are an AMD Radeon graphics card user, you should also optimize settings via the AMD Radeon control panel after adjusting video settings in-game.
To do so, you need to first check whether you have the latest graphics driver installed or not. If not, go to the AMD Radeon software or AMD’s official website to install it.
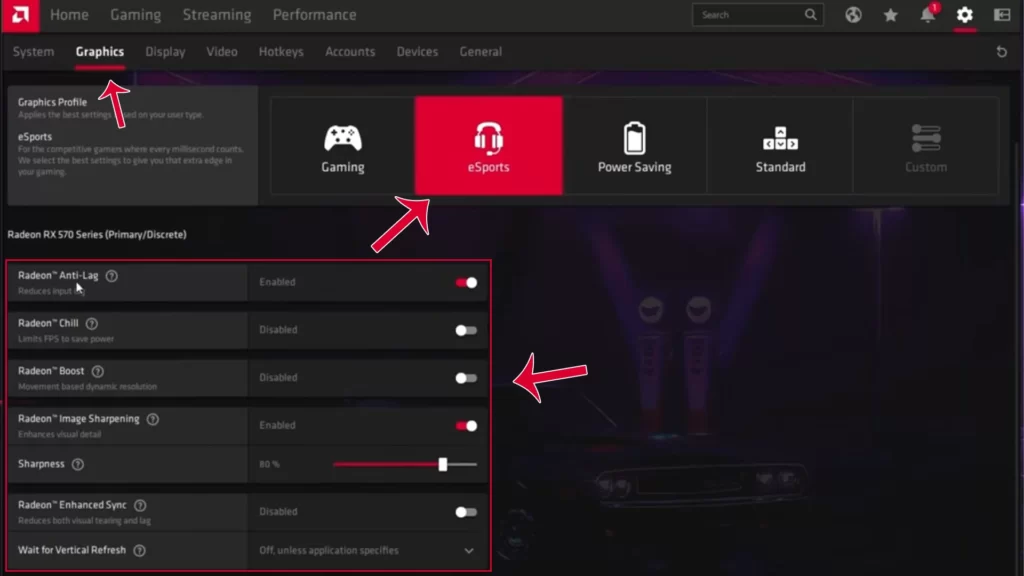
After having the latest AMD Radeon graphics driver installed, open the AMD control panel, click on the gaming tab, and subsequently go to the graphics settings section. There, you will see multiple settings profiles; we recommend choosing the “eSports” one, as this is perfect for competitive gamers.
In the eSports profile, there are numerous options to personalize. You can use the following best AMD Radeon graphics settings:
- Radeon Anti-Lag – Enabled*: It lowers the input lag and ultimately gives you better gaming experience.
- Radeon Chill – Disabled*: Radeon Chill is a fantastic feature; but not for all. This particular option limits FPS when you are not doing any camera and character movements. Enable it only if you have GPU heating and quick power loss issues. Otherwise, it is recommended to be disabled as it can disturb the overall gameplay enjoyment.
- Radeon Boost – Disabled*: Keep this option disabled because it lowers the game resolution during specific movements in VALORANT in order to boost performance.
- Radeon Image Sharpening – Enabled: When enabled, it enhances sharpness of visuals.
- Radeon Enhanced Sync – Enabled: The enhanced sync technology prevents screen tearing and reduces lag while giving stable frame rates.
*Note: Among Radeon Anti-Lag, Radeon Chill, and Radeon Boost, you can only enable one at a time.
These are the basic AMD Radeon settings for VALORANT. Now, let’s move on to some advanced ones.
We have already optimized most of these settings in-game. So, to avoid overriding, it is best to either keep them the same or disable them here.
- Anti-aliasing – Use application settings
- Anti-aliasing method – Multisampling
- Anti-aliasing (Morphological) – Disabled: No need to enable. The multisampling anti-aliasing is enough.
- Anisotropic filtering – Disabled
- Texture filtering quality – Performance
- Surface Format Optimization – Enabled: This setting can lower the video memory usage, resulting in better gaming experience.
- Tessellation mode – Override application settings: Tessellation can improve image quality; however, it lowers the FPS. To make this feature inactive, set it to Override application settings, then change the Maximum Tessellation level—which will appear just below—to Off.
- OpenGL Triple Buffering – Disabled
- Reset Shader Cache – Perform Reset: This is an AMD Radeon feature that allows you to delete cache files generated so far. Cache files are the files that are frequently being accessed in-game and these are stored on the system for faster loading of games. However, you may sometime need to delete them such as when you have updated the game. You can use this option to do so.
- HBCC Memory Segment – Enabled: This setting allows you to allocate some system memory to the graphics card. The graphics card memory may be insufficient in cases when more video memory is required. Hence, this feature is recommended to be enabled. You can allocate a specific amount of memory as per your preference.
The majority of settings have already been covered in this article’s earlier sections. Therefore, explanations for particular options are not very thorough in this AMD Radeon settings section.
If you have optimized the graphics settings for VALORANT up to now, you are almost done. You just now need to put in a little more effort to optimize your Windows for the game, which is covered in an upcoming section below. After that, you’re done, and you’re ready to bang into the game.
Best VALORANT graphics settings for low-end PCs (without graphics card)
For obvious reasons, playing VALORANT on a low-end system is challenging. To enjoy any PC game, you need a fair FPS and low input lag, but low-end systems, without proper settings optimization, cannot provide that.
Essentially, you need to optimize your VALORANT settings, notably the video settings, to improve the performance.
In the graphics settings for high-end PCs section, we covered all options available in the Video tab comprehensively, and most of the settings should remain the same for low-end PCs. Here are the settings you should play with:
General settings
- Display mode: Fullscreen
- Resolution: Monitor’s native resolution
- Aspect ration method: Letterbox
- Limit FPS on Battery – Off
- Limit FPS in Menus: On – 144 fps
- Limit FPS in Background: On – 30 fps
- Limit FPS always: Off
- NVIDIA Reflex Low Latency: On (if available)
Graphics quality settings
- Multithreaded rendering: Off
- Material Quality: Low
- Texture Quality: Low
- Detail Quality: Low
- UI Quality: Low
- Vignette: Off
- VSync: Off
- Anti-aliasing: None
- Anisotropic Filtering: 1x
- Improve Clarity: Off
- Experimental Sharpening: Off
- Bloom: off
- Distortion: Off
- Cast Shadows: Off
Stats settings
- Client FPS: Show Both (it will help you observe FPS fluctuations)
- Server Tick Rate: Text only
- Game Latency: Text only
Rest of the stats settings can be set to “Hide” or other options as per need and preferences.
Windows settings for VALORANT to get high FPS and Low Latency
Whether you are a high-end or low-end PC player, after you have optimized the in-game graphics settings and the GPU control panel settings, you should also optimize Microsoft Windows for optimum performance.
Here are some critical Windows settings to remember for any PC game, especially VALORANT.
Keep your Windows updated
The most important thing to remember is to keep your Windows version up to date, as an outdated version may cause lags and prevent your PC from implementing other settings properly.
Set power plan to High Performance
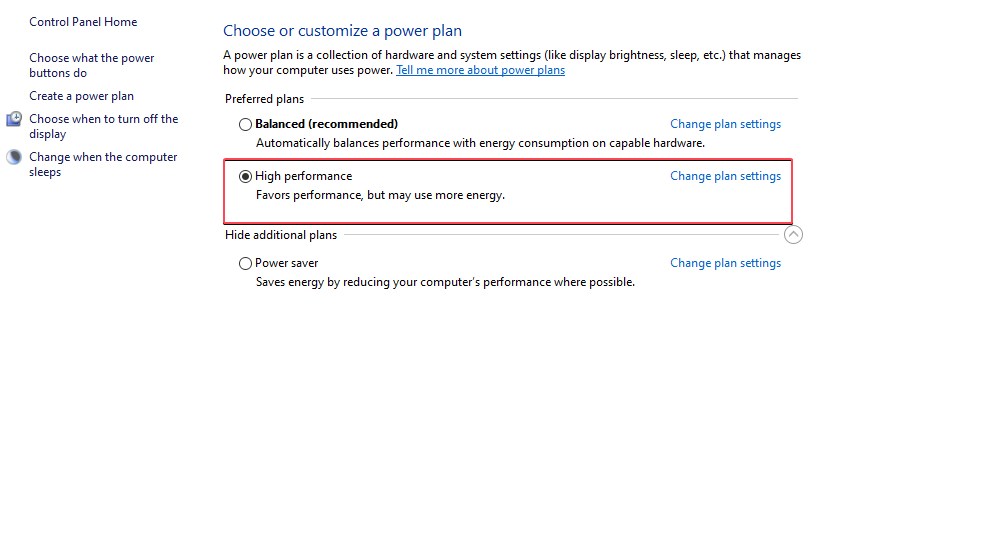
This feature favors performance at the expense of energy. If you don’t mind increased power consumption, you should enable this option to get better gaming performance.
- Path to this setting: Control Panel>Hardware and Sound>Power Options
Turn on Game Mode
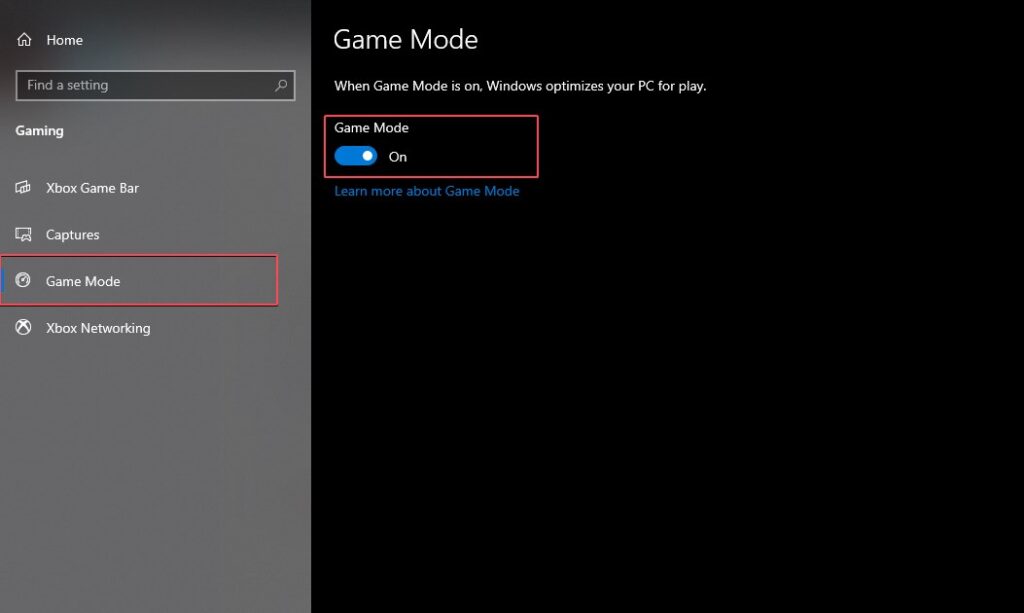
Window’s Game Mode feature optimizes your PC for gaming. Make sure you turn on this setting.
- Path to Game Mode setting: Settings>Gaming>Game Mode
Windows graphics settings
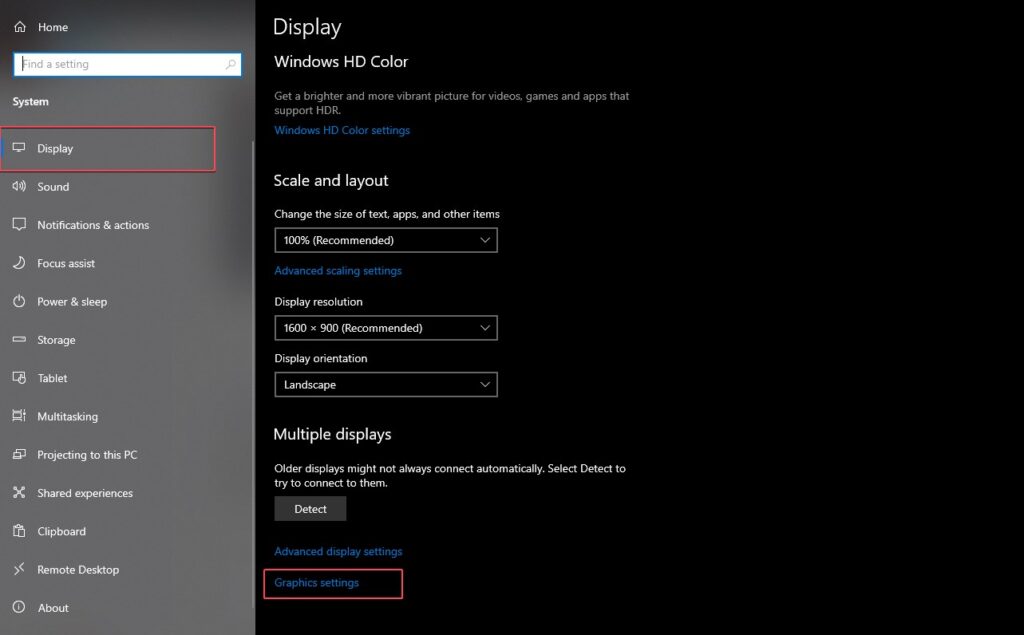
The Windows graphics settings section provides two fantastic options: Hardware-accelerated GPU Scheduling and performance preferences. You should enable the former and subsequently add VALORANT manually to set performance preferences for it.
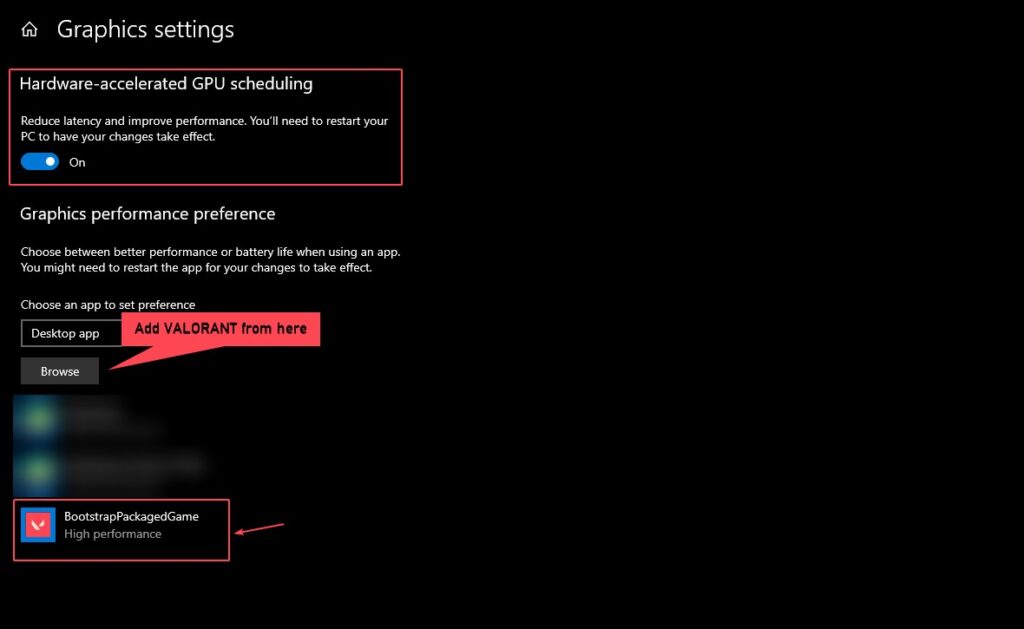
The Hardware-accelerated GPU scheduling setting reduces latency and improves performance. You will need to restart your PC for the tweaks to take effect.
- Path to graphics settings: Settings>Display>Graphics Settings
Disable unnecessary startup apps and clear applications running in background

Background apps, most of which are not usually necessary, consume notable amount of memory. Consequently, your PC does not allow maximum memory to VALORANT, resulting in lower performance.
Also, make sure you disable unnecessary startup applications. Startup applications are those that start automatically in the foreground or background when your PC boots. Disabling them will prevent them from auto-starting, and you’ll not need to close them manually.
You can disable them via the Task Manager panel.
- Path to this setting: Task Manager>Startup
These are the basic settings in Windows that can significantly improve VALORANT graphics, notably the FPS.
Conclusion
In this extended article, we discussed the best VALORANT graphics settings for both high-end and low-end PCs. Additionally, we covered optimizations to make in the GPU’s control panel and Windows system for optimum experience. Essentially, you should first examine your preferences before following any settings instructions.
We hope this article helped you in getting the smoothest graphics in Riot’s first-person shooter.